Bessler Start Page
Wheel Drawings
A Closer Look
Return to Home Page
A Closer Look At Bessler's Drawings:
A page of observations, speculations, interrogations, and dead ends.
While discussing contents of this web site with Doc, he looked me in the face and asked, "Aren't you grasping at straws with some of this?"
I hope my response surprised him as I exclaimed, "You bet I am! I'm going continue looking at every possible detail. Bessler said the answers are in there and I will take him at his word and make it available to anyone else who may be interested.
A Closer Look At A Little Detail:
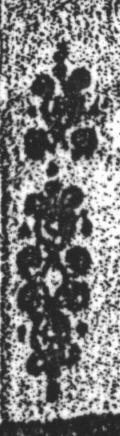
In Bessler's book "THE TRIUMPHANT PERPETUAL MOTION WHEEL" the drawing labeled Secunda Figura has two panels of drawings, and text keys for both, on a single piece of paper that is folded in to quarters. Between the titles of the two drawings there is a little squiggle thing that resembles an old wallpaper design. Please keep in mind that this is the top dead center of the One-Directional wheel drawing and text key lay out.
Upon very close examination, shown below, you find that it very well could be another Bessler's clues. The magnified drawing clearly shows a number of shapes and figures. This design is divided into three distinct parts with the top one being separated by a space and the bottom two being nearly mirror images.
The top one-third has a fish hook shape encircling a central object and is more or less outlined by the four smaller spirals with the lower right one completely broken off. The hook is held upright by a series of chain links that fade off into oblivion. There is a pennant flag and staff to the right of the circle and to the left there is an individual blob.
The second part, in the middle, shows a complete circle with a rod passing through or behind it that is angled upwards to the right. The object to the left is a triangular or heart shaped with it's tip pointing upward. The object to the right is a tear drop shaped "pendulum" hanging down from the end of the rod.
The bottom third shows another rod traversing the center of this circle, but now it is level and the objects at both ends are now more similar in appearance.
The hook and chain in the top part of the drawing would presumably be used to hold or lift something. Possibly it represents the hook at the end of the shaft in the center of Secunda Figura. Is it telling us that the hook does it's work when it is pulled straight upwards?
The middle figure is the most unique of the set, because the rod's tilt may indicate that it's weight is unbalanced. Opposed to the top and bottom figures with their ends being level. A conflict of which way the triangles are pointing in the top and middle sections rules out the likelihood that they are rotational direction indicators, but maybe they are indicating something else.
A Closer Look At The Measuring Scales:
The Bi-dirrectional and one way wheel "Prima Figura" drawings have measuring scales on them. They appear to have originally been incriments of inches with each inch representing a two foot long "ell".
The entire scale of the two way wheel drawing's measuring stick is divided into two channels that run the length of the scale separating top and bottom. In the middle ell there are four evenly spaced marks, sort of. The first mark in this group is in the lower channel and the other three are in the upper channel. A strange pattern indeed.
In the earlier twin drawing only the first ell is marked in feet and inches and the first six inches are the only ones marked out. The second half foot of each is blank space. On that drawing,however, the first foot has seven "inch" marks and the second foot has six. Is this a sign? Bessler was very nit-picky about his work and wouldn't make such obvious errors without trying to say something.
The right end of these scales stop directly under one of the boards marked number twelve. In the later Bi-directional wheel bessler went so far as to make the scale and/or frame of the picture actually becomes a part of that board.
The scale in "Prima Figura" is the largest being twice the length of the others. The only noticeable feature on this scale is that the two opposite ends, twenty-four inches, and twelve inches are uniquely pointed out. The twenty-four inch area is bracketed but the twelve inch part is blacked out. If you were to cut out that strip of scale and glue the free ends together you would have a continuous loop like the wheel. The strange thing is that those two marked/bracketed areas are not only connected together but they cover exactly ninety-degrees or one-quarter of the circumference.
A Closer Look At Push And Pull:
As shown in the "Bi-directional Wheel" page some of the information in this drawing would seem to conflict. The bottom weight of the two T-bars toward the left and middle of this drawing are moved outward by the hooked arm being pulled down. The positioning of the T-bar to the right indicates that it's hook arm is pushing up.
Secunda Figura also has a T-bar that is positioned as if the hooked arm is being pulled. Detail of this particular hook appears that it is designed to only pull.
The hooks to the right in the twin Bi-Directional drawings are the most interesting and are not even literal hooks at all. When closely comparing the twin drawings we find subtle but important changes in these, mostly in the loss of detail. The hook itself turns out to be an iron bar bent into a "C" with pivot points at the top and bottom. The top pivot is connected to the rest of the arm going upwards. The bottom pivot point just happens to be positioned at the exact center of the wheel behind it.
The non-hooks on the two arms in the middle and to the left are even more different in appearance. The bar itself more closely resembles the pattern of the twisted rope than a solid metallic object. In the earlier twin drawing this same hook looks like a steel strap that is bent into a "J" and identically attached to the protruding peg as well.
The hook in the middle of these drawings looks more "s" shaped and, if were it an actual hook it could reasonably be used to pull or push with. The hook terminates at it's tip end with a round ball that also at the center of the axle. The vague hint of a blob on the opposite end on the back side of the shaft suggests something other than a solid one piece construction of hook and arm. The twin drawing shows the detail a little better but still does not reveal the intent of its use.
A Closer Look At Locks:
I find it interesting that the locks securing bars or hasps in the bi-directional wheel drawings are curved, but the one-directional wheel securing bar is straight.
There is also a curious number inversion on of one of the locks. The number twenty-four becomes forty-two. Bessler corrected his books by hand when a mistake was found so this was no mistake.
A Closer Look At Small Wheels And Rope:
All of the pulleys and axles in both of the twin Bi-Directional Wheel drawings are the same diameter, however the left panel of Secunda Figura has two pulleys and the center axle should be considered because of their diameter variations.
Something goes out of the window in all of the drawings and the ropes could easily be symbolic of a transisition of forces or transmission of leverage. Please also note that the rope is at a sixty-degree angle in the Secunda Figura and forty-degrees in the Bi-Directional twins.
All of the ropes go on and off the pulleys with pictorial perfection except the one in the top right corner of the Bi-dirrectional drawing. The rope on this pulley going to the left and toward the floor pulley looks normal but where it goes around and down to the pulley to the right is way off the mark. It nearly goes straight down through the axle of the pulley itself. It too could be discounted as a simple error if it were not identical in the twin drawing. Is there a relationship to the T-bar arm being cut off at the opposite side of the page?
This same pulley has another unusual characteristic which is a white rim. There could be an association between this pulley and the top pivot points of middle and right T-bars because of similar white rims.
A Closer Look At Numbers:
A strange but hopefull looking pattern is the times two groups. Each number multiplied by two from one to twelve and twenty-one results in another number on the Bi-Directional drawing. A relationship case can be built for many of the associations. Here are a few examples:
The number eleven indicates the weights at the ends of the T-bar arms. The number twenty-two represents the weight being lifted outside of the window.
The number seven shows pegs on the axle that lift the hammer-mill weights and number fourteen is a screw on the axle that is holding the rope as it lifts the weight.
The number eight is the weighted T-bar arm that is being pulled (pushed), where as, the number sixteen is the rope being pulled by the machine.
The number five was difficult or nearly impossible to find, and the key attachment point of number ten is similarly difficult to discover.
The numbers four and eight and six and twelve have another relationship. Pendulum number eight does NOT hang on number four, it hangs on twelve and thirteen. If six and eight could represent weights,pendulum or otherwise, four and twelve become supports for their opposite number set.